Thursday, October 6, 2022

Harry Potter Party Digital Files (all in one place)

 It's been a long time since I've done a post here, but I recently had someone contact me about some of the Harry Potter birthday party items asking for a comprehensive list of all of my files for sale.  I thought that was a pretty good idea so here it is.  I have linked each item to it's individual post so that you can see what it looks like.

1.  Invitation letter, train ticket, supply list and Hogsmeade permission slip:  $6.00

2.  Gringott's Withdrawal Slip:  $2.00

3.  Ollivander's Label, wand number labels and wand description cards:  $6.00. NOTE:  I DO NOT have the file for the "Your Wand and You" booklet.

4. Standard Lesson Book:  $4.00. I realized I didn't have to many photos of the inside of the Lesson Book so here are a few to give an idea of what is inside.


5.  House attribute cards and House crest buttons:  $4.00

6.  Slug and Juggers potion label:  $2.00

7.  OWL Results and Certificate of Merit:  $4.00

8.  Chocolate Frog Wizard Cards:  $8.00


All files are PDFs and can be purchased either through PayPal at kellyldriver@yahoo.com or Venmo at @kellyldriver.

Once I receive notification of payment I will send the files.  

Sunday, October 4, 2020

Disney Princess Week (10/3/2020) Vanellope Von Schweetz


For our last day of Disney Princess Week we revisit an unconventional Princess, but technically a Princess, none the less...Vanellope Von Schweetz from Wreck It Ralph.  At the end of Wreck It Ralph we find out that Vanellope was the Princess of Sugar Rush.  We love Wreck It Ralph and Felix and Vanellope. We enjoyed meeting Vanellope at Disney World.

VANELLOPE VON SCHWEETZ


One of the reasons I chose Vanellope is because I thought this could be a fun dinner.  I wanted to make savory dinner dishes look like they were desserts to go with the whole Sugar Rush idea.

The Menu is set:

Taco "Ice Cream" Cones
Turkey Meatloaf "Cupcakes"
Sweet Cream "Cannoli" with Strawberry sauce dusted with sugar (aka Three Cheese Stuffed Manicotti)

I was able to keep the menu a surprise from everyone and even banned them from the kitchen area while I was cooking so it would be a surprise.  I can't believe it actually worked.  Also, I was so focused on the cooking and getting the timing right for everything that I forgot to take many pictures.

TACO "ICE CREAM" CONES

INGREDIENTS
1lb ground beef
1 envelope of taco seasoning
Corn Tortillas
Cherry tomatoes
Mashed Potatoes (see recipe below)
Red, Yellow and Orange bell peppers, finely diced

INSTRUCTIONS
1.  Heat up enough oil in a skillet to coat the bottom.

2.  Place a corn tortilla in the skillet on one side just for approx 30 until the one side just starts to barely brown.  Remove with tongs and place cooked-side up.  Using a cone shaper from a cannoli or waffle cone maker (OR I just used a regular ice cream cone), create a cone shape (careful, it's super hot!). Place the tortillas back into the skillet with the flap side down and brown the heck out of it.  Repeat on all sides and allow to drain and firm up on a paper towel.  NOTE:  This was pretty difficult to do.  I had a hard time getting them to stay together.

3.  Cook the ground beef according to the directions on the taco seasoning envelope.

4.  Put "cones" in a small glass, fill with taco meat and scoop out mashed potatoes, sprinkle with bell peppers and top with a cherry tomato.

TURKEY MEATLOAF "CUPCAKES"

INGREDIENTS
1.25 lbs. Ground All White-Meat Turkey Breast
1 egg beaten
1/4 cup Italian Bread Crumbs
1/4 Freshly Grated Parmesan Cheese plus additional for topping
1 Pepper chopped
1 Yellow Onion chopped finely
1/2 tbsp. of Italian seasonings
1 tsp. Red Pepper Flakes
salt and pepper
Mashed Potatoes (see recipe below)

INSTRUCTIONS
1.  Preheat oven to 400.

2.  Generously spray muffin tray with cooking spray or use muffin liners.  

3.  Combine all ingredients in large bowl and mix using hands until well blended.  Using a large scoop (I used a 3 Tbsp scoop), fill each muffin slot.  Sprinkle additional parmesan cheese on top of each "muffin".  


4.  Bake for 25 minutes or until a light crust has formed on each muffin.  Let stand 5 minutes to set.  Top with mashed potatoes.


SWEET CREAM "CANNOLI" WITH STRAWBERRY SAUCE AND SPRINKLED WITH SUGAR (AKA MANICOTTI WITH THREE CHEESES)

INGREDIENTS
12 Manicotti shells
3 cups shredded mozzarella
8 oz soft cream cheese with onions and chives
2 cups marinara sauce
Grated parmesan cheese

INSTRUCTIONS
1.  Preheat oven to 350.  Cook manicotti in a large pot of boiling water according to package directions.  drain and rinse with cold water; drain again.

2.  Spray a baking dish with cooking spray.  Mix Mozzarella with soft cream cheese.  Stuff the manicotti; place in prepared baking dish.

3.  Spoon marinara sauce over manicotti.  

3.  Combine all ingredients in large bowl and mix using hands until well blended.  Using a large scoop (I used a 3 Tbsp scoop), fill each muffin slot.  Sprinkle additional parmesan cheese on top of each "muffin".  

4.  Bake for 20 minutes.  Place on plate and sprinkle with parmesan.


MASHED POTATOES

INGREDIENTS
2lbs potatoes, peeled and cut into 1/2 inch pieces
2 sticks of unsalted butter, softened
1/2 cup heavy cream
2 tsp salt

INSTRUCTIONS
1.  Place potatoes in a large saucepan; add enough cold water to cover by about 2 inches.  Bring to a boil over medium-high heat.  Cook until tender, about 20 minutes.  Transfer to a colander, and drain; return potatoes to pan.

2.  Mash potatoes with a potato masher until light and fluffy.  Add butter, cream and salt; stir until combined, and set aside.

This was such a fun dinner and everything was very yummy.  It was extremely labor intensive.  I essentially made 3 dinners.  I was exhausted after wards but it was fun to see everyone's faces when I served them "dessert" for dinner.


Friday, October 2, 2020

Disney Princess Week (10/1/2020) Ariel


Our fourth day of Disney Princess Week we revisit and rewatch a long time favorite and the one that brought Disney animation back from the brink...The Little Mermaid.  The Little Mermaid was an all-time favorite of mine, I think mostly because it was the first time there was a red-head.  It was the first Disney Princess movie I ever showed Bug-A-Boo and a stuffed Ariel was her first luvie.


She is also a favorite whenever we visit the parks, with and without her fins.


ARIEL


I knew I wanted to do some form of Surf and Turf to represent both her Under the Sea life and her On Land life.  Part of me felt weird doing the Surf part because of the whole Under the Sea lyrics:

But fish in the bowl is lucky
They in for a worser fate
One day when the boss get hungry
Guess who's gon' be on the plate?

As well as the entire song, Les Poissons.


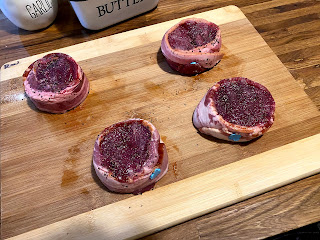
I decided to do Filet Mignon with a Crab Stuffing (I know, I know, poor Sebastian).  It's just so good.

The Menu is set:
Surf and Turf-Filet Mignon 
with Crab Stuffing and cream sauce
Steamed Broccoli

THE PERFECT FILET MIGNON

INGREDIENTS
2 filet mignon steaks, each about 6- to 8-ounces and 2-inches thick
1 tablespoon extra-virgin olive oil 
Kosher salt 
Freshly ground black pepper 

INSTRUCTIONS

1. Remove the filets from your refrigerator and set them on your counter top for approximately 30 minutes. This allows them to come to room temperature. Filet mignon is lean and typically does not require any trimming.

2.  Meanwhile, pre-heat your oven to 425 degrees.

3.  After your filets have come to room temperature, season the top and bottom surfaces with salt and black pepper, using your fingers to gently press down on the seasoning so it adheres to the meat. Do not season the sides. Set aside.


4.  Heat an oven-proof stainless steel sauté pan over medium-high heat. Add the olive oil and let it get hot. Then add the filets and let them cook undisturbed for 4 minutes. DO NOT move the filets around in the pan during this time. Then, using a pair of tongs, flip the filets over to the second side and IMMEDIATELY transfer the entire sauté pan to your pre-heated oven. Cook the filets in your oven for 5-8 minutes, depending on your preferred level of doneness: 5-6 minutes for rare, 6-7 minutes for medium-rare or 7-8 minutes for medium.

5.  Carefully remove the sauté pan from your oven and transfer the filets to a clean plate. Tent them with foil and let them rest for 5-7 minutes. Do not leave the filets to rest in your sauté pan, or they will overcook due to the residual heat in the pan.

6.  Transfer the filets to serving plates, spooning any residual juices over top. Serve immediately.

CRABMEAT STUFFING AND SAUCE

INGREDIENTS

Crabmeat Stuffing

1 pound blue crabmeat

1 stalk celery, minced

1/4 onion, minced 

1 teaspoon parsley, chopped

1 tablespoon mayonnaise

1/2 cup bread crumbs

1/4 cup Island Princess macadamia nuts, toasted &chopped

1 whole egg, beaten

1 teaspoon lemon juice

splash Worcestshire sauce

3 tablespoons butter

Salt & Pepper to taste


Sauce

1/4 cup butter

1 teaspoon flour

1 clove garlic, finel minced

1 teaspoon paprika

1/4 cup heavy whipping cream

1/4 teaspoon better than bouillon beef base

1/8 cup white wine

salt & pepper to taste

juice of 1/2 lemon


INSTRUCTIONS


Stuffing
1.  In a saute pan on medium heat, melt butter. Add minced celery and onions to the pan and cook until onions are opaque.  


2.  Add parsley, bread crumbs, lemon juice, worcestshire, crabmeat and season with salt and pepper to taste.  Remove from heat and put mixture in a bowl deep enough for mixing.  Allow mixture to cool for 5 minutes.  


3.  In the same pan, toast macadamia nuts until golden brown.  Add macadamia nuts,beaten egg and mayonnaise to slightly cooled stuffing and mix stuffing thouroughly.  Set aside.


4.  Top the steaks with the stuffing and stick under the broiler until stuffing is browned.


Sauce
1.  Melt butter to saute pan on medium heat.  Add garlic and cook for 1-2 minutes.


2.   Add flour and cook until flour turns into a golden brown hue.  


3.  Add white wine and cook for 2 minutes.  

4.  Add bouillon and whisk into mixure.  


5.  Add remaining ingredients and continue whisking until completely smooth.  


6.  Finish with juice of 1/2 lemon.


7.  Put the sauce on the plate and then the steak on top of the sauce.

The meal was a great twist on Surf-n-Turf and it was super yummy!


Thursday, October 1, 2020

Disney Princess Week (9/30/2020) Rapunzel

Our third day of Disney Princess Week we revisit and rewatch Tangled, the story of Rapunzel.  Bug-A-Boo's was a big fan of Rapunzel and went as her for Halloween in 2010.

RAPUNZEL


She was also very excited to meet her at Walt Disney World a few years later.


Our dinner tonight is inspired by Rapunzel's magical hair.  After last night's labor intensive meal I wanted something easy and figured this was it.  

The Menu is set...

Angel Hair pasta with ground turkey
Homemade Roasted Tomato Vodka Sauce 
Braided Breadsticks

Even thought the sauce is homemade, it is still super simple and you can make it ahead of time, put it in a jar and refrigerate until ready to use.

HOMEMADE ROASTED TOMATO VODKA SAUCE

INGREDIENTS

2 pounds of Roma Tomatoes
1 pound of Grape Tomatoes
4 tablespoons Olive Oil
1/2 teaspoon Sea Salt
1 tablespoon Butter
3 cloves of Garlic
1 medium-sized White Onion
freshly ground Black Pepper
Red Pepper Flakes
½ cup Vodka
½ cup Heavy Cream
½ grated Parmesan
Serve with fresh Basil

INSTRUCTIONS

1.  Heat your oven to 375 degrees. Slice the grape tomatoes in half and cut the roma tomatoes into loose quarters. Place the grape tomatoes and roma tomatoes on separate baking sheets. Drizzle each with 1 tablespoon of olive oil and then sprinkle generously with salt. Roast the tomatoes in the oven for 25-40 minutes, until soft and fragrant. The grape tomatoes will cook more quickly than the roma.


2.  Place the tomatoes and all of their juices in a food processor and puree until smooth. Set puree aside for now.

3.  Finely chop the onion. Then heat the butter and 2 tablespoons olive oil in a pot over medium heat. Once hot, add the onion and season with salt and pepper. Let cook for 2 minutes, then run the garlic through a garlic press and stir it into the onion. Saute for 5 minutes, until the onions are soft and translucent.
 
4.  Add a pinch of red pepper flakes (or more if you like spice). Stir into the onions. Then add the vodka.

5.  Saute until the vodka has reduced by half, then add the pureed tomatoes. Let the sauce simmer and reduce for 5 minutes.

6.  Lastly, stir in the parmesan and cream. Add more salt and pepper to taste if necessary.


7.  When serving the sauce with pasta, it is best to let the pasta finish cooking right in the sauce. Undercook the pasta by a minute or two. Add 1/2 cup of pasta water to the sauce, then add the pasta and let the pasta cook in the sauce until al dente.


8.  Serve the pasta with some fresh basil, it really brings out the flavor of this sauce.


Tuesday, September 29, 2020

Disney Princess Week (9/29/2020) Mulan


For our second day of Disney Princess Week we revisit and rewatch Mulan, one of Bug-A-Boo's (and my) favorite "Princesses".  Technically, Mulan is not a Princess. She was neither born royal or married into it but she is still a bad-ass warrior and therefore a Princess.  

MULAN

One of my favorite Disney World memories is meeting Mulan with my BFF.  We had a girls weekend in 2008 and decided to attempt to Drink Around the World at EPCOT.  We started in Canada and were doing pretty good and feeling really good by the time we got to China.  We were so excited to see Mulan because we think she is such an example of Girl Power.  We literally chased her down, probably scaring the crap out of her, and then proceeded to tell her how awesome we thought she was.  I'm sure she had a big laugh that 2 grown women were acting like crazy people.


Since then, our next interactions with Mulan were a lot more appropriate.  There was no yelling and running.  Bug-A-Boo loved meeting Mulan and was very excited to tell her she was studying TaeKwonDo.  


We were also fortunate enough to visit Mulan's home country of China and we even visited the Great Wall of China.

We are all huge fans of American Chinese food and after visiting China and experiencing authentic Chinese food I began learning how to make some of our favorites.  By far, Dumplings are our all time favorite and while it is labor intensive, for a beginner at least, the homemade versions are far superior to the frozen grocery store version.


The Menu is set:

Mu-Shu Pork Roll-Up 
Homemade Classic Pork & Chinese Chive Dumplings 
White Rice

While not authentic this wrap recipe is delicious and named after Mulan's spirit guide, Mushu.

MU-SHU PORK ROLL-UPS


INGREDIENTS

2 tablespoons soy sauce

4 tablespoons dry sherry

2 teaspoons cornstarch

1 teaspoon sugar

teaspoon black pepper

8 ounces pork tenderloin, cut against the grain in 1/4-inch slices, then cut into strips 

2 teaspoons large eggs

¼ teaspoon kosher salt

1 teaspoon toasted sesame oil

4 teaspoons canola oil

2 cups shiitake mushrooms, stemmed and sliced

2 cups packed, shredded green cabbage

½ cup shredded carrots 

1 cup thinly sliced scallions

2 teaspoons minced ginger

2 teaspoons minced garlic

8 (6-inch) flour tortillas

Hoisin sauce


INSTRUCTIONS

1.  Stir together the soy sauce, sherry, cornstarch, sugar, and pepper in a medium bowl. Add the pork, then set it aside to marinate for 30 minutes. 


2.  Lightly beat the eggs with the salt. Warm the sesame oil in a large nonstick skillet over medium heat. Scramble the eggs until soft-cooked, about 1 minute, then transfer them to a large plate and break them into small pieces. Wipe the pan clean.

3.  Heat 1 teaspoon of the canola oil in the same skillet over medium-high heat. Remove the pork from the bowl, gently squeezing the strips to reserve the excess marinade. Add the pork to the pan in a single layer, let it cook undisturbed for 2 minutes, then stir-fry it until it is caramelized and just cooked through, about 2 minutes more. Transfer it to the plate with the scrambled eggs. 

4.  Add another 2 teaspoons of the canola oil to the skillet and stir-fry the mushrooms, about 2 minutes. Add the cabbage and carrots and stir-fry until all the vegetables are just tender, about 3 minutes. Make a well in the center of the vegetables and add the remaining teaspoon of canola oil. Add roughly half the scallions, the ginger, and the garlic, and stir-fry them for 1 minute, then combine them with the other vegetables. 


5.  Create a well again in the center of the mixture, add the reserved marinade, and allow it to simmer for 2 minutes. Return the pork and egg to the skillet and toss the mixture until it is heated through, about 2 minutes. Transfer it to a serving bowl. 


6.  Warm the tortillas under a damp paper towel in the microwave, about 50 seconds. To serve, place each tortilla on a plate, smear it with a teaspoon of hoisin sauce, and add the pork mixture. Sprinkle on some of the remaining scallions, then roll up the tortilla.


CLASSIC PORK & CHINESE CHIVE DUMPLINGS


INGREDIENTS

1-1/2 lbs Napa cabbage, cored and very finely chopped

1/4 cup finely chopped onion

3-1/2 tsp kosher salt

1 lb fatty (80/20) ground pork

1/4 finely chopped scallions

1/4 chopped garlic chives

1 large egg, beaten

1 Tbsp cornstarch

1 Tbsp plus 1 tsp soy sauce

1-1/2 tsp minced garlic

1 tsp minced peeled fresh ginger

1 tsp sesame oil

3/4 tsp freshly ground black pepper

1 (1 lb) package round dumpling wrappers


INSTRUCTIONS

  1. In a fine-mesh colander, mix the cabbage, onion, and 2-1/2 tsp salt.  Let stand while you get everything else ready, at least 10 minutes.  Grab handfuls of the stuff and squeeze as hard as you can to get rid of all the liquid.

2.  Transfer the dried cabbage-onion mix to a large bowl and add the pork, scallions, chives, egg, cornstarch, soy sauce, garlic, ginger, sesame oil, pepper, and remaining 1 teaspoon salt.  Use your hands to get everything evenly distributed and well-mixed.  It's best to use your hands because you can get everything incorporated into the meat without making the pieces of meat too small.


3.  If you have time, cover and refrigerate the filling until nice and cold, up to 2 days.  The filling will be easier to spoon into your wrappers when it's chilled.

4.  When you're ready to cook, for your prep deck ready to wrap the dumplings.  Get your wrappers and a damp towel.  You want to keep your wrappers covered with the towel so they won't dry out.  You will need a bowl of water, your filling and a sheet pan with parchment paper to set your completed dumplings on.


Set out five wrappers and using a spoon make a small football shape ball of the filling and place in the center of the wrapper.  Using the water wet the edges of the wrappers.


 Fold in half and fold a pleat in the middle right, press tightly together, sealing the wrapper.


Fold a second pleat on the right side and press together.


Fold the end into a "V" and press tightly, sealing it shut.


Do the exact same thing on the other side.


6.  When you are ready to cook use a non-stick frying pan.  Add 2 teaspoons of oil to the pan and coat the pan with it.  Place the dumplings in a rosette shape in the pan.  Add 3 Tablespoons of water to the pan.  Put the heat on medium high and cover.  This should take about 7 minutes if fresh and 10 minutes if frozen.


7.  Serve with sauce of choice.

SOY-VINEGAR SAUCE


INGREDIENTS

1/4 cup soy sauce

4 teaspoons of rice wine vinegar

1 clove of garlic

1/4 tsp black pepper

2 Tbsp water


Mix together and refrigerate until ready to use. 


I served this with some Jasmine Rice and a Soy-Vinegar sauce.  Everything was delicious and I had plenty of dumplings that I was able to freeze for another time.  I ran out of round dumpling wrappers but I had some square WonTon wrappers so I used the remaining filling to make small WonTons to freeze that we can put into soup.

Join us tomorrow for Rapunzel!